Implementing risk management in your project
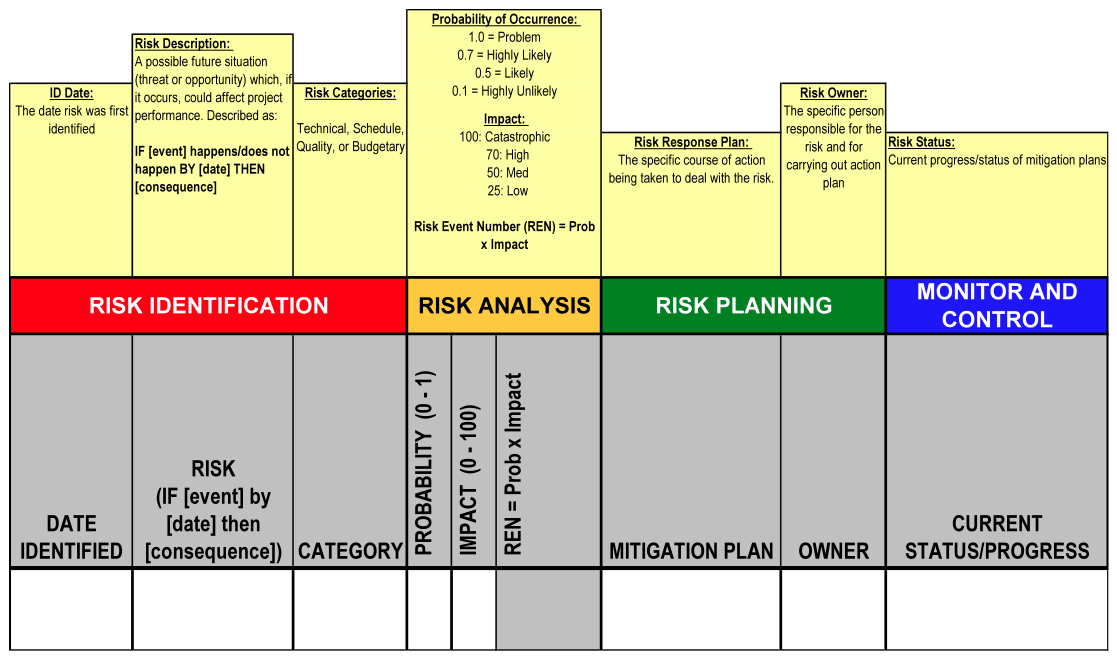
As stated previously, we choose to manage some project risks via a spreadsheet template (see diagram below; click on image to enlarge).
As can be seen, each of the processes is included within the spreadsheet (or risk register), with the exception of risk management planning. The idea is that each horizontal entry represents one risk or issue. If it is a risk, the format for capturing it is in a specific format: IF <event> BY <date> THEN <consequence>. Because risks are uncertain events, it is useful to state them in this format so that the point at which this risk may become an issue is clear. Note: not all risks become issues; that is part of their inherent uncertainty.
As part of risk identification, we also capture the date on which the risk was identified and the category to which the risk belongs. Risk identification has been shown to be a significant part of risk management in that it makes one aware of potential events or issues that may impact the group.
Following this, we want to quantity and qualify the individual risk itself. Many organisations use a ‘risk matrix’ to control this (e.g. magnitude and likelihood). The mechanism employed here multiplies the probability of risk (value between 0.0 and 1.00) by the impact of the risk if it were to become an issue (values range 1 to 100). This produces a REN or Risk Event Number, a way of ascribing a value (1 to 100) to each risk. Depending upon your organisation’s preferences, you may consider colour-coding the REN cell (clear, yellow, red) as a means of drawing attention to high-probability, high-impact risk.
Additionally, this mechanism enables us to collectively sort all of the risks, allowing us to recognise at any point how close any particular risk is to turning into an issue. It also allows users to sort and compare project risks.
Continuing left to right, the next field is labeled ‘mitigation’. Within this field, we want to capture our risk mitigation plans. This requires that we look ahead, consider and plan as to what we will do to manage our risks and their potential progression to becoming issues. We find that having multiple plans in place helps to maintain a balance as to how we’ll manage our risks. To this end, we prefer to categorise the plans as either MITIGATE, MONITOR, ENCOURAGE, or ACCEPT.
The last two fields include the risk owner (who is primarily responsible for the risk) and a running status of the risk. The latter should be updated each time the risk status is changed, so that one has a history log for all the risks.
Maintaining and reporting
Through the process of periodic evaluation and review of the risks (e.g. project manager to review risk register with entire team on a monthly basis) and updating issues and risks individually when necessary, the risk register becomes a “living” record. This includes the current potential for a risk becoming an issue (via REN), as well as its current owner and status.
Additionally, reporting top risks via sorting of highest value REN allows your audience—team members, customers, and senior staff/sponsors—to quickly notice potential issues that could impact your project, as well as develop plans to deal with associated risks and issues via the risk mitigation plan section.
This article has provided an overview of a specific risk management implementation that can be adapted to most projects. While risk management is far more than maintaining a risk register, the tools for making decisions are essential. As a result, it is the hope of the authors that you will find these tools and their implementation useful for providing a framework in which you, too, can be a successful manager of program and project risk.


